Build and deploy AWS Lambda function with .NET 6
Objective
The objective of this article to demonstrate how to build and deploy a .NET6 application in AWS lambda.
Prerequisites
- Visual Studio 2022 or later with the .NET 6 SDK and AWS ToolKit installed.
- An AWS account and basic knowledge of CloudFormation, AWS Lambda and .NET6
Step-1: Build .NET6 based AWS lambda from Visual Studio
Create a new .NET 6 Lambda Function Project
- Open Visual Studio and select “Create a new project” from the start page.
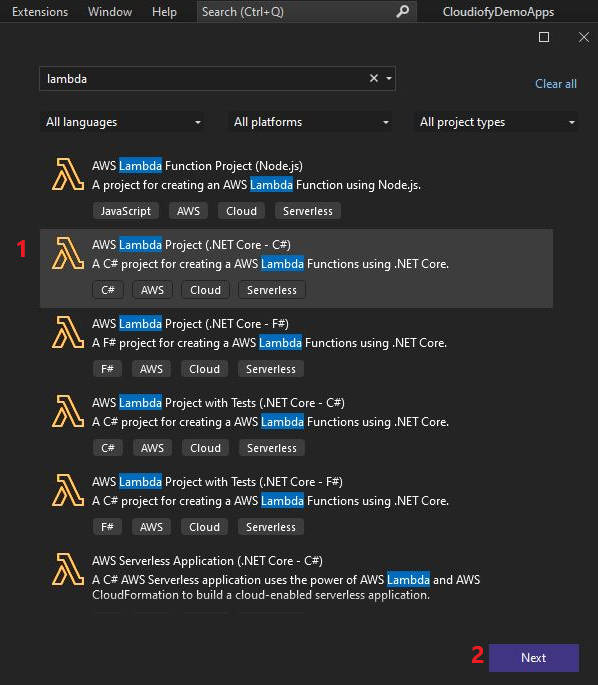
- Select “AWS Lambda” from the list of project templates and click “Next”.
- Select “AWS Lambda (.NET 6)” as the project type and give your project a name and location. Click “Create”.

Write Lambda function
- Delete existing “Function.cs” file and create a new “CustomerFunctions.cs” file in the project.
- Replace the existing code with your own Lambda function code. Here is an example of 5 Lambda function in C#:
using Amazon.Lambda.Core;
using System;
using System.Collections.Generic;
using System.Linq;
using System.Text;
using System.Threading.Tasks;
using Amazon.Lambda.Core;

// Assembly attribute to enable the Lambda function's JSON input to be converted into a .NET class.
[assembly: LambdaSerializer(typeof(Amazon.Lambda.Serialization.SystemTextJson.DefaultLambdaJsonSerializer))]

namespace AWSLambdaApp
{
    public class CustomerFunctions
    {
        private readonly List<Customer> _customers;
        public CustomerFunctions()
        {
            _customers = new List<Customer>
            {
                new Customer { Id = 1, Name = "Alice", Email = "Alice@example.com", Address = "G1/111 - Canary St." },
                new Customer { Id = 2, Name = "Bob", Email = "Bob@example.com", Address = "G1/112 - Canary St." },
                new Customer { Id = 3, Name = "Avi", Email = "Avi@example.com", Address = "404 - High St." }
            };
        }
        //Get all customers
        public List<Customer> GetAll(ILambdaContext context)
        {
            return _customers;
        }
        //Get all customer by Id
        public Customer GetById(int id, ILambdaContext context)
        {
            return _customers.FirstOrDefault(c => c.Id == id);
        }
        //Add new customer
        public Customer Add(Customer customer, ILambdaContext context)
        {
            _customers.Add(customer);
            return customer;
        }
        //Update existing customer
        public Customer Update(int id, Customer updatedCustomer, ILambdaContext context)
        {
            var existingCustomer = _customers.FirstOrDefault(c => c.Id == id);
            if (existingCustomer == null)
            {
                return null;
            }
            existingCustomer.Name = updatedCustomer.Name;
            existingCustomer.Email = updatedCustomer.Email;
            existingCustomer.Address = updatedCustomer.Address;
            return existingCustomer;
        }
        //Delete customer by id
        public bool Delete(int id, ILambdaContext context)
        {
            var customerToDelete = _customers.FirstOrDefault(c => c.Id == id);
            if (customerToDelete == null)
            {
                return false;
            }
            _customers.Remove(customerToDelete);
            return true;
        }
    }
}
Create a supporting model class “Customer.cs”
namespace AWSLambdaApp
{
    public class Customer
    {
        public int Id { get; set; }
        public string Name { get; set; }
        public string Email { get; set; }
        public string Address { get; set; }
    }
}
Now, you can build your project from Visual Studio or through command Line. Let’s build and publish Lambda code from command line:
Make sure before running commend check your “*.csproj” file contains configuration for “runtimeidentifiers” like:
<PropertyGroup>
<RuntimeIdentifiers>win10-x64;linux-x64</RuntimeIdentifiers>
</PropertyGroup>
Run the command following commands to restore, build and publish your lambda project:
dotnet restore -p:PublishReadyToRun=true -p:PublishTrimmed=truedotnet publish -c Release --self-contained true --no-restore -r linux-x64 /p:PublishReadyToRun=true
ZIP the content from Publish Folder like “AWSLambdaApp.zip”. Your lambda function is ready to deploy in AWS.
Step-2: Deploy .NET6 based AWS lambda using cloud formation template
Create a new file called “create-lambda-functions-cf.template” and paste the following code.
{
    "AWSTemplateFormatVersion" : "2010-09-09",
    "Transform"                : "AWS::Serverless-2016-10-31",
    "Description"              : "AWS Lambda (Serverless) Application.",
    "Parameters"               : {
        "S3BucketName" : {
            "Type" : "String",
            "Description" : "S3 bucket name containing the lambda code."
        },
        "CodeZipFileName" : {
            "Type" : "String",
            "Description" : "S3 key (CodeZipFileName) for the lambda function code ZIP file."
        }
    },
    "Resources"                : {
        "LambdaExecutionRole" : {
            "Type" : "AWS::IAM::Role",
            "Properties" : {
                "AssumeRolePolicyDocument" : {
                    "Version" : "2012-10-17",
                    "Statement" : [
                        {
                            "Effect" : "Allow",
                            "Principal" : {
                                "Service" : "lambda.amazonaws.com"
                            },
                            "Action"    : "sts:AssumeRole"
                        }
                    ]
                },
                "Path"                     : "/",
                "Policies"                 : [
                    {
                        "PolicyName" : "lambda-execution-policy",
                        "PolicyDocument" : {
                            "Version" : "2012-10-17",
                            "Statement" : [
                                {
                                    "Effect" : "Allow",
                                    "Action" : [
                                        "logs:CreateLogGroup",
                                        "logs:CreateLogStream",
                                        "logs:PutLogEvents"
                                    ],
                                    "Resource" : "arn:aws:logs:*:*:*"
                                }
                            ]
                        }
                    }
                ]
            }
        },
        "GetAllCustomers"     : {
            "Type" : "AWS::Lambda::Function",
            "Properties" : {
                "Architectures" : [
                    "x86_64"
                ],
                "Handler"       : "AWSLambdaApp::AWSLambdaApp.CustomerFunctions::GetAll",
                "Runtime"       : "dotnet6",
                "MemorySize"    : 256,
                "Timeout"       : 30,
                "Role"          : {
                    "Fn::GetAtt" : [
                        "LambdaExecutionRole",
                        "Arn"
                    ]
                },
                "Code"          : {
                    "S3Bucket" : {
                        "Ref" : "S3BucketName"
                    },
                    "S3Key"    : {
                        "Ref" : "CodeZipFileName"
                    }
                }
            }
        },
        "GetCustomerById"     : {
            "Type" : "AWS::Lambda::Function",
            "Properties" : {
                "Architectures" : [
                    "x86_64"
                ],
                "Handler"       : "AWSLambdaApp::AWSLambdaApp.CustomerFunctions::GetById",
                "Runtime"       : "dotnet6",
                "MemorySize"    : 256,
                "Timeout"       : 30,
                "Role"          : {
                    "Fn::GetAtt" : [
                        "LambdaExecutionRole",
                        "Arn"
                    ]
                },
                "Code"          : {
                    "S3Bucket" : {
                        "Ref" : "S3BucketName"
                    },
                    "S3Key"    : {
                        "Ref" : "CodeZipFileName"
                    }
                }
            }
        },
        "AddCustomer"         : {
            "Type" : "AWS::Lambda::Function",
            "Properties" : {
                "Architectures" : [
                    "x86_64"
                ],
                "Handler"       : "AWSLambdaApp::AWSLambdaApp.CustomerFunctions::Add",
                "Runtime"       : "dotnet6",
                "MemorySize"    : 256,
                "Timeout"       : 30,
                "Role"          : {
                    "Fn::GetAtt" : [
                        "LambdaExecutionRole",
                        "Arn"
                    ]
                },
                "Code"          : {
                    "S3Bucket" : {
                        "Ref" : "S3BucketName"
                    },
                    "S3Key"    : {
                        "Ref" : "CodeZipFileName"
                    }
                }
            }
        },
        "UpdateCustomer"      : {
            "Type" : "AWS::Lambda::Function",
            "Properties" : {
                "Architectures" : [
                    "x86_64"
                ],
                "Handler"       : "AWSLambdaApp::AWSLambdaApp.CustomerFunctions::Update",
                "Runtime"       : "dotnet6",
                "MemorySize"    : 256,
                "Timeout"       : 30,
                "Role"          : {
                    "Fn::GetAtt" : [
                        "LambdaExecutionRole",
                        "Arn"
                    ]
                },
                "Code"          : {
                    "S3Bucket" : {
                        "Ref" : "S3BucketName"
                    },
                    "S3Key"    : {
                        "Ref" : "CodeZipFileName"
                    }
                }
            }
        },
        "DeleteCustomer"      : {
            "Type" : "AWS::Lambda::Function",
            "Properties" : {
                "Architectures" : [
                    "x86_64"
                ],
                "Handler"       : "AWSLambdaApp::AWSLambdaApp.CustomerFunctions::Delete",
                "Runtime"       : "dotnet6",
                "MemorySize"    : 256,
                "Timeout"       : 30,
                "Role"          : {
                    "Fn::GetAtt" : [
                        "LambdaExecutionRole",
                        "Arn"
                    ]
                },
                "Code"          : {
                    "S3Bucket" : {
                        "Ref" : "S3BucketName"
                    },
                    "S3Key"    : {
                        "Ref" : "CodeZipFileName"
                    }
                }
            }
        }
    }
}
This cloud formation template consists of two parts: defining an IAM role (LambdaExecutionRole) and defining five AWS Lambda functions (GetAllCustomers, GetCustomerById, AddCustomer, UpdateCustomer, and DeleteCustomer). These Lambda functions use the specified IAM role (LambdaExecutionRole) and the code for each Lambda function is stored in the specified S3 bucket name (i.e. cloudiofy-application-code) using the S3 key (i.e. AWSLambdaApp.zip).
Deployment Steps
- Login to your AWS Console and navigate to the “CloudFormation” service
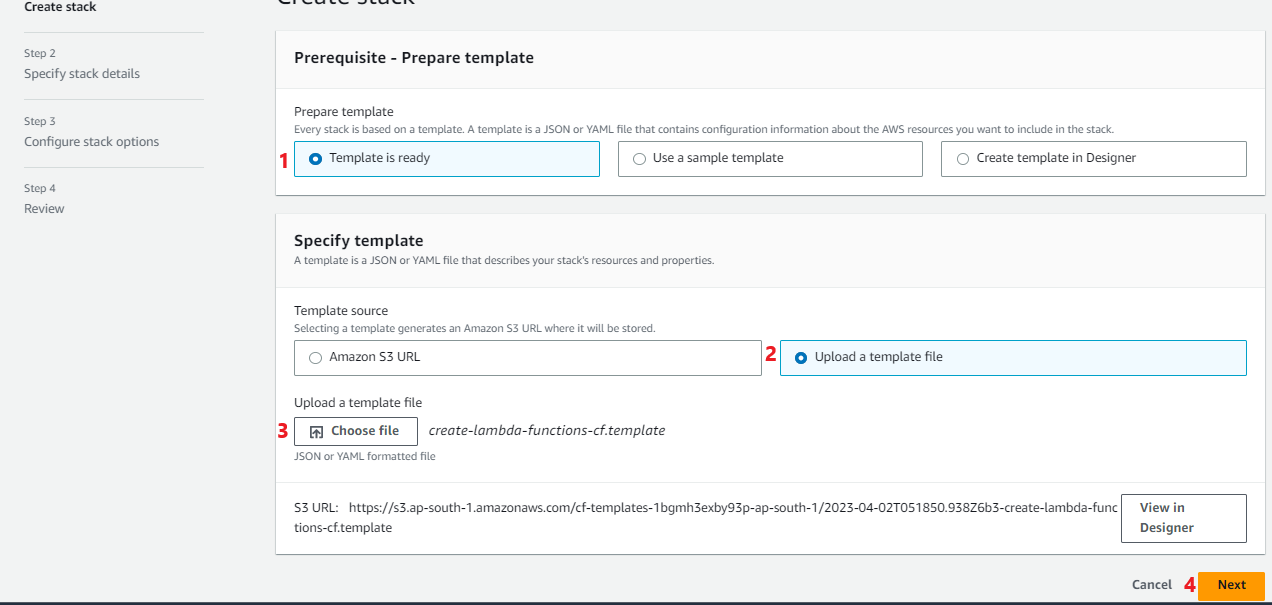
- Click on the “Create stack” button to start the cloud formation creation process.
- Upload your created template file “create-lambda-functions-cf.template”, Click on “Next”

- Specify the stack details, Click on “Next”

- Stack failure options, Select option “Roll back all stack resources”
- Review and , Click on “Submit”. AWS resources creation will be started as per the code in the template file. Wait till stack creation complete.

Step-3: Test Lambda Function
- Go to “Lambda” service, and validate the lambda functions created by the cloud formation template.

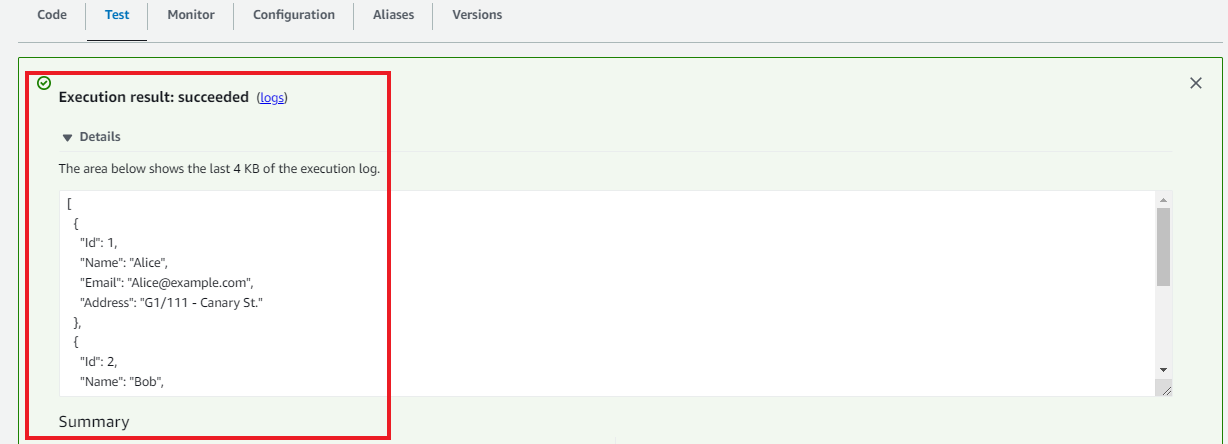
- Go to Lambda Function “GetAllCustomers” and Test the function, it should return the list of customers.


Note: Delete the cloud formation stack “customer-lambda-app-stack” to delete AWS resources created by cloudformation template.
